
Threading occurs at the end of the production chain when you have already invested a lot of time, energy and money in the component. If something were to go wrong now, this would result in expensive reworking and, in the worst case, even the loss of the component. We show you typical problems that occur when thread tapping, thread milling and fluteless tapping and how you can prevent them in advance.
Thread Tapping
Thread chips
Swirling chips that wind around the tool shaft are often caused by insufficient cutting speed. By increasing the cutting speed, the chips are pushed away from the tool.
If the spiral shape of the thread tap is too shallow, this can also be problematic for chip flow. Here tools with 45° to 50° spiral shape are recommended. In the case of steel materials, it is also possible to use tools with a bright flute or bright correction. This creates shorter chips.
Thread is too small or too big
The thread is smaller than intended? This may be due, for example, to the fact that the thread tap has decreased in circumference due to heavy wear. In this case, the only option is to use a new tool. Lag errors on the machine can also be the cause of threads that are too small, for example if the machine does not run exactly on the helix angle due to rigid clamping setups. This problem can be solved by using a synchro tapping chuck.
A thread can also be enlarged unintentionally due to excessive cutting speed or jammed chips. You should also check whether there is an axis offset between the pre-drilled hole and the threading tool. In this case, the hole position may not be correct and the alignment of the hole may not match the threading tool. In this case, clamping of the workpiece can help.
Tool breakage
The main reason for tool breakage when thread tapping is jammed chips. Here, you should ensure good chip removal by using high spirality or adjusting the cutting speed.
In the case of through holes in particular, it must be ensured that the tool runs completely through the thread and that the final turn is completely cut out so that the chips can be safely discharged downwards. Only then should you switch to counterclockwise rotation. In the case of blind hole threads, on the other hand, it is important that the thread tap does not run down to the bottom of the hole, as this can also lead to tool breakage. Therefore, check the core hole depth or drill deeper if permitted. Alternatively, you can use a thread tap with a shorter chamfer lead to create more space between the hole base and the thread depth.
Fluteless Tapping
Thread is not fully formed
If the thread profile is not fully formed after fluteless tapping,this may be because the pre-drilled hole is too large. In this case, you should select a suitable pre-drill diameter for the next core hole.
Thread is overformed
Conversely, the thread may be overformed if the pre-drill diameter selected was too small, meaning the fluteless tap had to displace too much material. In addition to choosing the correct pre-drill diameter, sufficient cooling lubrication is crucial here, too: If the oil concentration in the emulsion is too low, this leads to a build-up of material in the hole and, as a result, the thread in the core diameter becomes too small.
Thread surface is unclean
Here, too, the cause is often insufficient cooling lubrication and material adhesion on the tool. Make sure that the oil concentration in the emulsion is sufficient.
Thread Milling
Thread tapers downwards
It is often the case that the thread gets narrower at the bottom or is too narrow as a whole. Tapered threads are mainly created during climp thread milling. It is therefore worth adjusting the programming to conventional thread milling. Our free programming aid “CNC Gühro ThreadMill” helps you with reprogramming.
Excessive radial load can also be the cause of a tapered thread. You can spread this radial pressure using a radial cut index (2/3 to 1/3) and thus relieve the load on the tool. For very deep threads (2.5xD), an axial cut index (50:50) helps. An HPC chuck, which is perfectly suited for thread milling, is also a quick solution. You can also reduce the radial pressure by reducing the feed rate.
Cutting edge chipping
Again, too high a feed rate can cause the cutting edges to chip. The problem can be solved by reducing the feed rate per tooth. Collisions often occur during machining, for example when the tool hits an interfering edge on the workpiece or fixture. Poor chip removal during thread milling can also result in tool breakage. An internal coolant supply is therefore advisable.
Poor thread surfaces
Poor thread surfaces are particularly common when thread milling takes place under unstable conditions. Once again, the tool holder makes the difference here: The HPC chuck ensures a clean thread without chatter marks. You can also check whether the tools’ projection length can be reduced further or whether contamination in the holder or on the shank is interfering with the concentricity. Even with unstable workpiece clamping, the component tends to vibrate, which is reflected on the thread surface.
In our web seminar “Troubleshooting Threads: The biggest mistakes and how to avoid them” in the Gühring Academy, we reveal more tricks for preventing problems during thread production in advance. Register here now and get started!

Technical advice and support are also available quickly and directly via our service hotline 00800 2607 2607
We can also be reached on WhatsApp: +49 172 658 53 53. Save the number!
You might also be interested in:
PCD is worth it: Maximum tool lives in aluminium
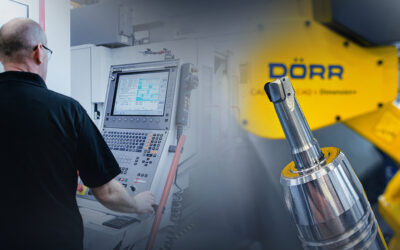
How real progress emerges from challenges is demonstrated by Dörr together with Gühring: By using the PKD Diver from Gühring, the company from Sankt Augustin quadruples tool life, reduces tooling costs, and elevates the surface quality of its components to a new level.
Through the night without interruption: System 208 increases stability
Unattended night shifts without risk: Veile Feindrehteile significantly increases process reliability and tool life in stainless steel machining with System 208. The result: stable processes, less scrap, and more cost-efficient production.
Nuclear reactor in decommissioning: Master INOX threads with ease
Decommissioning nuclear power plants demands maximum precision—especially for stainless steel threads. Weisser Bärwinkel relies on Gühring’s Pionex to master even tough materials. The result: more stable processes, longer tool life, and higher productivity.